Puppet Components
In the previous article we have seen Puppet basic. Now let’s discuss about Puppet Components :
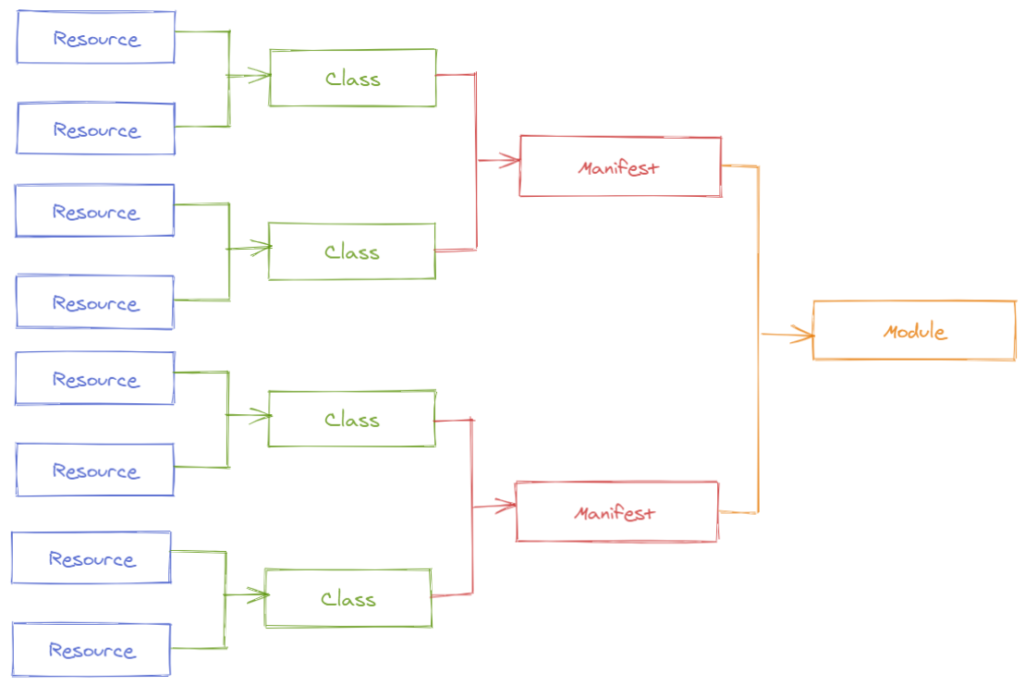
- Resources : In-built functions that runs at the back and performs underlying operations in Puppet (like to work with files, services, users etc.)
- Classes : are a combination of different resources and operations. It is multiple operations toward a single goal.
- Manifests : are directories containing multiple .pp files. Definitions and declarations of Puppet Classes.
- Modules : are a collection of files and directories such as manifests, class definitions, and other any dependent files that work together. For example a “Jenkins” module used to install Jenkins.

Puppet Commands
Here are some useful Puppet commands in order to run our following example :
# Display puppet help man page
$ puppet help |more

# Find a resource
$ puppet resource --types | grep -i user

# Describe a resource to get attributes and info
# puppet describe <resource-name>
$ puppet describe user
# Validate the default site manifest at /etc/puppetlabs/puppet/manifests/site.pp:
$ puppet parser validate

# Test the default site manifest at /etc/puppetlabs/puppet/manifests/site.pp
$ puppet apply --noop

# Run the default site manifest at /etc/puppetlabs/puppet/manifests/site.pp
$ puppet apply
Example
In this quick example, we will see how you can install, configure and start NTP service on all of your nodes.
First we can create a new directory for testing :
$ mkdir /var/tmp/demo-lionel
$ cd /var/tmp/demo-lionel
$ vi install-ntp.pp
We ca now add our code like so :
# NTP Package installation

package { "ntp":
  ensure => "present",
}

# NTP File configuration

file { "/etc/ntpd.conf":
  ensure => "present",
  content => "server 0.centos.pool.ntp.org iburst\n",
}

# NTP Service startup
service { "ntpd":
  ensure => "running",
}
Now that we have our code, we can validate our code running :
$ puppet parser validate install-ntp.pp
Finally, we can apply running :
# Dry run
$ puppet apply install-ntp.pp --noop

# Run !
$ puppet apply install-ntp.pp
As seen previously, Puppet code is idempotent. It means that the results will remain the same even if we run the code several times on nodes. Puppet resources are developed with checks already in place so it does not error out if something is already in place !
Let’s create our first Class
Now that we have seen how to use Puppet, we can use our previous code to create a Class called ntpconfig. This will make our code reusable and hence help to avoid writing the same code over and over !
class ntpconfig {
  # NTP Package installation
  package { "ntp":
    ensure => "present",
  }

  # NTP File configuration
  file { "/etc/ntpd.conf":
    ensure => "present",
    content => "server 0.centos.pool.ntp.org iburst\n",
  }

  # NTP Service startup
  service { "ntpd":
    ensure => "running",
  }

}

# In order to test, we declare our Class in the same file
include ntpconfig
To test your code, just proceed as previously with the apply command. Don’t forget that Class name should be unique, such as resource titles.
Manifests
In our previous examples we have created files in a temporary directory. Puppet has a manifests directory which avoid creating codes at differents locations. You can get default manifest directory running :
$ puppet config print
/etc/puppetlabs/code/environments/production/manifests
You will notice that there is a site.pp file (on the opensource version you have to create it (!) ) which is the default .pp file for Puppet. You will declare in it all Puppet Classes using keyword include. We will also move our install-ntp.pp in our manifests directory.
Nodes
Imagine you want to run code only on specific nodes. Using our previous example, we want to configure ntp server only on agent02.example.com. To proceed, in the site.pp file configure your node as so :
$ cat /etc/puppetlabs/code/environments/production/manifests/site.pp

node "agent02.example.com" {

  include ntpconfig

}
node "default" {

}
It’s a good practice to separate code to class and to nodes configuration as we did.
Hiera
If we want to use Classes with different configurations for our nodes, we can use Hiera.
Indeed, Hiera is a powerful way to store (class parameter) data outside of your pp files. Hiera also stores this data in a efficient hierarchial structure so to minimize code duplication. This is especially useful when you want to declare a class that requires a lot of class parameters.
Example
$ cat /etc/puppetlabs/code/environments/production/manifests/ntp-demo.pp

class { "ntp":

  enable => "true"
  servers => "pool.ntp.org"

}

# Now let's configure our customized value for "servers" through Hiera

$ cat hiera.yml

---
ntp:servers:
  - pool.ntp.org
That’s all for today ! Thanks 🙂
Sources
puppet.com/docs

